打造自己的vim golang IDE
# 前提条件
vim版本在8.1以上(ubuntu 20可以直接执行),centos需要升级vim版本
# centos配置
1、编译安装vim
#配置python3,ycm默认只支持python3.6+
yum -y install python3 python3-devel
git clone https://github.com/VundleVim/Vundle.vim.git

./configure --enable-python3interp=yes

make && make install
如果没有提示ycm必须在python3.6以上版本运行则表示没有问题,如果提示表示vim编译时没有读到python3,大概率时安装python3有问题
2
3
4
5
6
7
8
其他步骤相同,以上完成基本设置
# 一、安装vundle
- 方式一
mkdir -p ~/.vim/bundle
cd ~/.vim/bundle
git clone https://github.com/VundleVim/Vundle.vim.git
2
3
vim ~/.vimrc
set nocompatible
filetype off
set rtp+=~/.vim/bundle/Vundle.vim
call vundle#begin()
Plugin 'gmarik/Vundle.vim'
call vundle#end()
filetype plugin indent on
2
3
4
5
6
7
保存退出
# 二、安装vim-go
cd ~/.vim/bundle
git clone https://github.com/fatih/vim-go.git
2
vim ~/.vimrc
在call vundle#begin()和call vundle#end()之间再添加如下配置:
Plugin 'fatih/vim-go'
保存后,重新打开 vim 编辑器,在命令行的模式输入:PluginInstall,回车
vim ~/.vimrc
:PluginInstall
2
安装完成后左下角会显示DONE
理论上在此完成后+安装gocode就可以通过crtl+o+x进行补全。
# 三、安装 go.tools Binaries
vim ~/.vimrc
:GoInstallBinaries
2
由于有些命令文件是无法自动安装完成,这就需要手动进行安装啦。首先对比目录,看缺少哪些命令没有安装完成,然后去gitHub上搜索,找到对应的命令源码之后,使用git clone 下载到本地,然后使用 go install命令进行安装即可。前面已经讲解过如何安装啦,这里就不再赘述。
相关工具的gitHub路径:
golint: https://github.com/golang/lint.git
gocode: https://github.com/nsf/gocode.git
errcheck: https://github.com/kisielk/errcheck.git
gotags: https://github.com/jstemmer/gotags.git
实测基本只有gocode没下载成功,需要手动下。gocode用来代码补全,实际目前已经可以手动补全,但是没有出现补全。
# 四、安装ycm
安装ycm是为了获取实时自动补全,像ide那样。
- 安装cmake gcc g++
sudo apt-get install cmake gcc g++
没有g++会有以下报错
Tell CMake where to find the compiler by setting either the environment variable "CXX" or the CMake cache entry CMAKE_CXX_COMPILER to the full path to the compiler, or to the compiler name if it is in the PATH.
- 安装python dev,视py版本而定
没有python dev会有以下报错:
ERROR: Python headers are missing in /usr/include/python3.8
解决
# sudo apt-get install python3-dev

#如果是centos
# 安装EPEL源
yum install epel-release -y
# 安装python3开发包,具体看python版本,如果是3.6则
yum install python36-devel -y
2
3
4
5
6
7
- 获取YCM代码
cd ~/.vim/bundle
因为ycm 全部下载有200多M,github很慢,失败率极高,建议用脚本慢慢下,或者通过国内镜像网站
#!/bin/bash

while true
do
git clone --recursive https://github.com/Valloric/YouCompleteMe.git
if [ $? -ne 0 ];then
    echo 下载失败
else
    echo 下载成功
    exit 0
fi
done
2
3
4
5
6
7
8
9
10
11
12
13
14
- 编辑.vimrc
call vundle#rc()
Plugin 'Valloric/YouCompleteMe'
filetype plugin indent on     " required!
let g:ycm_global_ycm_extra_conf='~/.vim/bundle/YouCompleteMe/third_party/ycmd/cpp/ycm/.ycm_extra_conf.py'
2
3
4
在*.vimrc中添加如下内容**,位置在* call vundle#begin() 和 call vundle#end() 之间。
Bundle 'Valloric/YouCompleteMe' 或Plugin 'Valloric/YouCompleteMe'
- 安装ycm
vim ~/.vimrc
:BundleInstall
2
- 安装golang自动补全
./install.py --gocode-completer
# 五、配置vim颜色
新老方案建议选择新方案
# 👉最新配色方案😊
前提条件:securecrt 9.x版本
下载主题
cd ~/.vim
git clone https://gitee.com/wu_mang/vim-one.git
mkdir ~/.vim/colors
cp vim-one/colors/one.vim colors/
1
2
3
4配置.vimrc
vim .vimrc
"配色开关
syntax on
" 开启24bit的颜色,开启这个颜色会更漂亮一些,真彩色
set termguicolors
" 配色方案, 可以从上面插件安装中的选择一个使用


colorscheme one" 选择”one“主题
let g:airline_theme='one'
let g:one_allow_italics = 1
set background=dark " 主题背景 dark-深色; light-浅色
"设置颜色
set t_Co=256
let g:rehash256 = 1
1
2
3
4
5
6
7
8
9
10
11
12
13
14
15修改环境变量
vim ~/.bash_profile
 export TERM=xterm-color
1
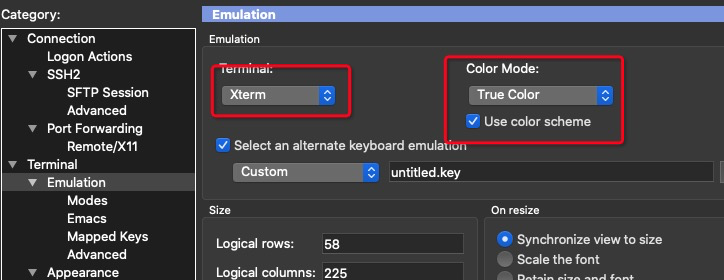
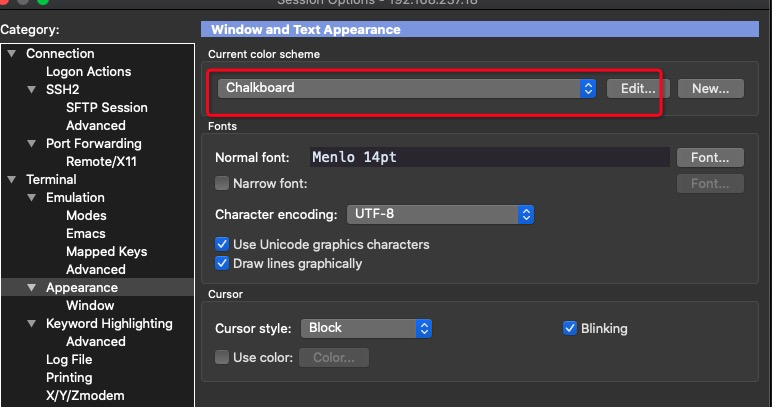
2配置securecrt
Options-session-options-terminal-Emulation
Options-session-options-Appearance
# 👉老配色方案😊
1、下载主题
cd ~/.vim
git clone https://github.com/tomasr/molokai.git
mkdir ~/.vim/colors
cp molokai/colors/molokai.vim ~/.vim/colors
2
3
4
2、配置.vimrc
vim ~/.vimrc
syntax on
set t_Co=256
colorscheme molokai
let g:molokai_original = 1
let g:rehash256 = 1
2
3
4
5
6
3、修改环境变量
 ~/.bash_profile
 export TERM=xterm-color
2
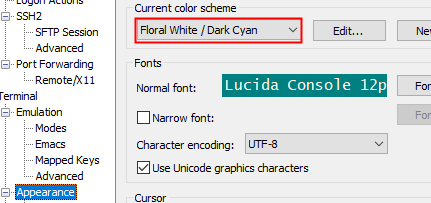
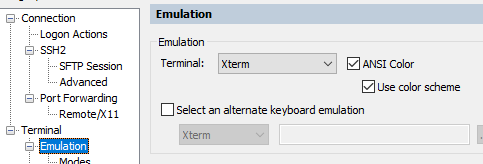
4、secure_crt设置
# 六、插件
理论上以上配置可以进行go开发工作了,但如果要把vim打造成一个IDE呢?
那就继续配置吧!
- nerdtree 目录树
按F7 打开/关闭目录树(快捷键自己随便定义)
Vim ~/.vimrc
call vundle#begin()

Plugin 'scrooloose/nerdtree'

call vundle#end()
#安装目录树插件映射,F7打开/关闭目录树
map <F7> :NERDTreeMirror<CR>
map <F7> :NERDTreeToggle<CR>
2
3
4
5
6
7
8
9
执行:PluginInstall
- 缩略图tagbar
效果类似是vscode右侧缩小显示
Vim ~/.vimrc
call vundle#begin()

Plugin 'majutsushi/tagbar'

call vundle#end()
#安装目录树插件映射,F8打开/关闭缩略图
nmap <F8> :TagbarToggle<CR>
2
3
4
5
6
7
8
执行:PluginInstall
- 函数跳转
光标在某变量或函数上,输入gd跳转。ctrl+o返回
yum -y install ctags
go get -u github.com/jstemmer/gotags
vim ~/.vimrc //添加如下内容,需要删除空行
let g:tagbar_type_go = {
    \ 'ctagstype' : 'go',
    \ 'kinds'     : [
        \ 'p:package',
        \ 'i:imports:1',
        \ 'c:constants',
        \ 'v:variables',
        \ 't:types',
        \ 'n:interfaces',
        \ 'w:fields',
        \ 'e:embedded',
        \ 'm:methods',
        \ 'r:constructor',
        \ 'f:functions'
    \ ],
    \ 'sro' : '.',
    \ 'kind2scope' : {
        \ 't' : 'ctype',
        \ 'n' : 'ntype'
    \ },
    \ 'scope2kind' : {
        \ 'ctype' : 't',
        \ 'ntype' : 'n'
    \ },
    \ 'ctagsbin'  : 'gotags',
    \ 'ctagsargs' : '-sort -silent'
\ }
2
3
4
5
6
7
8
9
10
11
12
13
14
15
16
17
18
19
20
21
22
23
24
25
26
27
28
29
30
- 成对符号补全
比如() [] {}
Vim ~/.vimrc
call vundle#begin()

Plugin 'Raimondi/delimitMate'
或Plugin 'jiangmiao/auto-pairs'

call vundle#end()
2
3
4
5
6
7
8
推荐auto-pairs
执行:PluginInstall
另一种方式,优点是{}会自动空行,两者可以结合使用效果如下
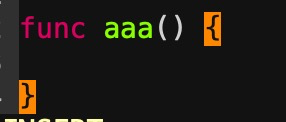
Vim ~/.vimrc
inoremap ' ''<ESC>i
inoremap " ""<ESC>i
inoremap ( ()<ESC>i
inoremap [ []<ESC>i
inoremap { {<CR>}<ESC>O
2
3
4
5
6
缺点是,换行可能会造成vim崩溃
- 添加头部注释
需要自己定义模板文件,并且总是出现vim-go自动添加的package等信息下面
Plugin 'aperezdc/vim-template'
执行:PluginInstall
模板信息
vim ~/.vim/bundle/vim-template/templates
/*
@Time : %YEAR%/%MONTH%/%DAY%
@Author : zicheqingluo
@File : %FFILE%
*/

%HERE%
2
3
4
5
6
7
8
- 高亮单词 mark.vim
1、两个压缩包都执行以下操作:
gzip -d mark.xxx.gz
vim 打开解压后的文件
输入 :so %
2、添加快捷键
vim ~/.vimrc
nmap ml <Plug>MarkSet #高亮或反高亮一个单词
nmap md <Plug>MarkClear
nmap mn <Plug>MarkSearchAnyNext #跳转到任一下一个高亮单词
nmap mp <Plug>MarkSearchAnyPrev
nmap mf <Plug>MarkSearchCurrentNext #跳转到当前高亮的下一个单词
nmap mb <Plug>MarkSearchCurrentPrev
2
3
4
5
6
7
8
9
10
11
12
- 安装ACK 全局查找
yum install epel-release -y
yum install ack -y
vim ~/.vimrc
call vundle#begin()
Plugin 'mileszs/ack.vim'
call vundle#end()
保存退出
执行vim
执行PluginInstall
vim ~/.vimrc
map <F4> :Ack<CR>
报存退出,光标在函数或变量上F4即可。
2
3
4
5
6
7
8
9
10
11
12
- 配置代码折叠
vim ~/.vimrc
" 代码折叠
set fdm=indent
" vim-go 代码折叠解决保存不显示折叠问题
let g:go_fmt_experimental = 1
" 映射到快捷键
map <F3> zc<CR>
map <F4> zo<CR>
2
3
4
5
6
7
8
选取了折叠方式后,我们就可以对某些代码实施我们需要的折叠了,由于我使用indent和marker稍微多一些,故以它们的使用为例:如果使用了indent方式,vim会自动的对大括号的中间部分进行折叠,我们可以直接使用这些现成的折叠成果。
在可折叠处(大括号中间):
zc      折叠
zC     对所在范围内所有嵌套的折叠点进行折叠
zo      展开折叠
zO     对所在范围内所有嵌套的折叠点展开
[z       到当前打开的折叠的开始处。
]z       到当前打开的折叠的末尾处。
zj       向下移动。到达下一个折叠的开始处。关闭的折叠也被计入。
zk      向上移动到前一折叠的结束处。关闭的折叠也被计入。
2
3
4
5
6
7
8
辅助插件
 "解决nerdtree不共享问题
 Plugin 'jistr/vim-nerdtree-tabs'

 "代码补全提示
  Plugin 'Shougo/neocomplcache.vim'
1
2
3
4
5
# 七、个性化配置
vim ~/.vimrc

"--------------------------------额外的配置
"自动缩进
set autoindent
"显示行号
set number
"暂时没用到
"let g:go_disable_autoinstall = 0
"解决使用自动缩进后退格键不能使用的问题
set backspace=indent,eol,start
"tab宽度
set ts=4
"把插入的tab换成空格,解决python问题
set expandtab
"自动缩进时,缩进长度为4
set shiftwidth=4
"手动tab缩进时,保持和shiftwidth长度一致
set softtabstop=-1
"关闭预览窗口
set completeopt-=preview

"//在系统启动时候启动neocomplcache 代码补全
let g:neocomplcache_enable_at_startup = 1
"//提示的时候选择第一个
let g:neocomplcache_enable_auto_select = 1


"go语言 配置
let g:go_highlight_functions = 1
let g:go_highlight_methods = 1
let g:go_highlight_structs = 1
let g:go_highlight_operators = 1
let g:go_highlight_build_constraints = 1
let g:go_fmt_command = "goimports"
2
3
4
5
6
7
8
9
10
11
12
13
14
15
16
17
18
19
20
21
22
23
24
25
26
27
28
29
30
31
32
33
34
35
# 八、问题排查
vundle安装插件报错,如图:

报错原因
这其中,有 Vundle 版本的差别,旧版配置:vundle#rc()、Bundle。 新版配置:vundle#begin()、Plugin。
# 附录
.vimrc完整配置,包括上面所有配置+修改tab为4个空格等兼容设置
"配置vundle
set nocompatible
filetype off
set rtp+=~/.vim/bundle/Vundle.vim
"自动识别文件类型、用文件类型plugin脚本、使用缩进定义文件
filetype plugin indent on


" YCM配置
"call vundle#rc()
filetype plugin indent on     " required!
let g:ycm_global_ycm_extra_conf='~/.vim/bundle/YouCompleteMe/third_party/ycmd/cpp/ycm/.ycm_extra_conf.py'


"vim插件----------------------------------------

call vundle#begin()

"vim bundle管理
"Plugin 'gmarik/Vundle.vim'

"vim go插件
Plugin 'fatih/vim-go'

"ycm
Plugin 'Valloric/YouCompleteMe'

"nerdtree 目录树
Plugin 'scrooloose/nerdtree'

"缩略图 类似vscode右边那栏
Plugin 'majutsushi/tagbar'

"成对符号补全
Plugin 'Raimondi/delimitMate'

"代码模板
Plugin 'aperezdc/vim-template'

"ACK全文搜索
Plugin 'mileszs/ack.vim'

"解决nerdtree不共享问题
Plugin 'jistr/vim-nerdtree-tabs'

"代码补全提示
Plugin 'Shougo/neocomplcache.vim'

"代码主题配色
Plugin 'morhetz/gruvbox'

" colorscheme one 配色主题
Plugin 'rakr/vim-one'
"其他主题
" colorscheme neodark
""Plugin 'KeitaNakamura/neodark.vim'
" colorscheme monokai
""Plugin 'crusoexia/vim-monokai'
" colorscheme github:PluginInstall
""Plugin 'acarapetis/vim-colors-github'

call vundle#end()

"开启颜色
syntax on
" 开启24bit的颜色,开启这个颜色会更漂亮一些
set termguicolors
" 配色方案, 可以从上面插件安装中的选择一个使用
colorscheme one
let g:airline_theme='one'
let g:one_allow_italics = 1
set background=dark " 主题背景 dark-深色; light-浅色

"设置颜色
set t_Co=256
let g:rehash256 = 1

"ACK全文搜索
map <F5> :Ack<CR>
"go import
map <F6> :GoImports<CR>

"目录树快捷键映射
map <F7> :NERDTreeMirror<CR>
map <F7> :NERDTreeToggle<CR>

"缩略图快捷键
nmap <F8> :TagbarToggle<CR>

"高亮单词
nmap ml <Plug>MarkSet
nmap md <Plug>MarkClear
nmap mn <Plug>MarkSearchAnyNext
nmap mp <Plug>MarkSearchAnyPrev
nmap mf <Plug>MarkSearchCurrentNext
nmap mb <Plug>MarkSearchCurrentPrev

"代码折叠,开启后默认折叠
"set fdm=indent
" vim-go 代码折叠解决保存不显示折叠问题
"let g:go_fmt_experimental = 1
" 映射到快捷键
map <F3> zc<CR>
map <F4> zo<CR>


"函数跳转
let g:tagbar_type_go = {
    \ 'ctagstype' : 'go',
    \ 'kinds'     : [
        \ 'p:package',
        \ 'i:imports:1',
        \ 'c:constants',
        \ 'v:variables',
        \ 't:types',
        \ 'n:interfaces',
        \ 'w:fields',
        \ 'e:embedded',
        \ 'm:methods',
        \ 'r:constructor',
        \ 'f:functions'
    \ ],
    \ 'sro' : '.',
    \ 'kind2scope' : {
        \ 't' : 'ctype',
        \ 'n' : 'ntype'
    \ },
    \ 'scope2kind' : {
        \ 'ctype' : 't',
        \ 'ntype' : 'n'
    \ },
    \ 'ctagsbin'  : 'gotags',
    \ 'ctagsargs' : '-sort -silent'
\ }

"--------------------------------额外的配置
"自动缩进
set autoindent
"显示行号
set number
"禁止自动下载
"let g:go_disable_autoinstall = 0
"解决使用自动缩进后退格键不能使用的问题
set backspace=indent,eol,start
"tab宽度
set ts=4
"把插入的tab换成空格,解决python问题
set expandtab
"自动缩进时,缩进长度为4
set shiftwidth=4
"手动tab缩进时,保持和shiftwidth长度一致
set softtabstop=-1
"关闭预览窗口
set completeopt-=preview

"//在系统启动时候启动neocomplcache 代码补全
let g:neocomplcache_enable_at_startup = 1
"//提示的时候选择第一个
let g:neocomplcache_enable_auto_select = 1


"go语言 配置
let g:go_highlight_functions = 1
let g:go_highlight_methods = 1
let g:go_highlight_structs = 1
let g:go_highlight_operators = 1
let g:go_highlight_build_constraints = 1
let g:go_fmt_command = "goimports"
2
3
4
5
6
7
8
9
10
11
12
13
14
15
16
17
18
19
20
21
22
23
24
25
26
27
28
29
30
31
32
33
34
35
36
37
38
39
40
41
42
43
44
45
46
47
48
49
50
51
52
53
54
55
56
57
58
59
60
61
62
63
64
65
66
67
68
69
70
71
72
73
74
75
76
77
78
79
80
81
82
83
84
85
86
87
88
89
90
91
92
93
94
95
96
97
98
99
100
101
102
103
104
105
106
107
108
109
110
111
112
113
114
115
116
117
118
119
120
121
122
123
124
125
126
127
128
129
130
131
132
133
134
135
136
137
138
139
140
141
142
143
144
145
146
147
148
149
150
151
152
153
154
155
156
157
158
159
160
161
162
163
164
165
166
167
168
169
170
效果图
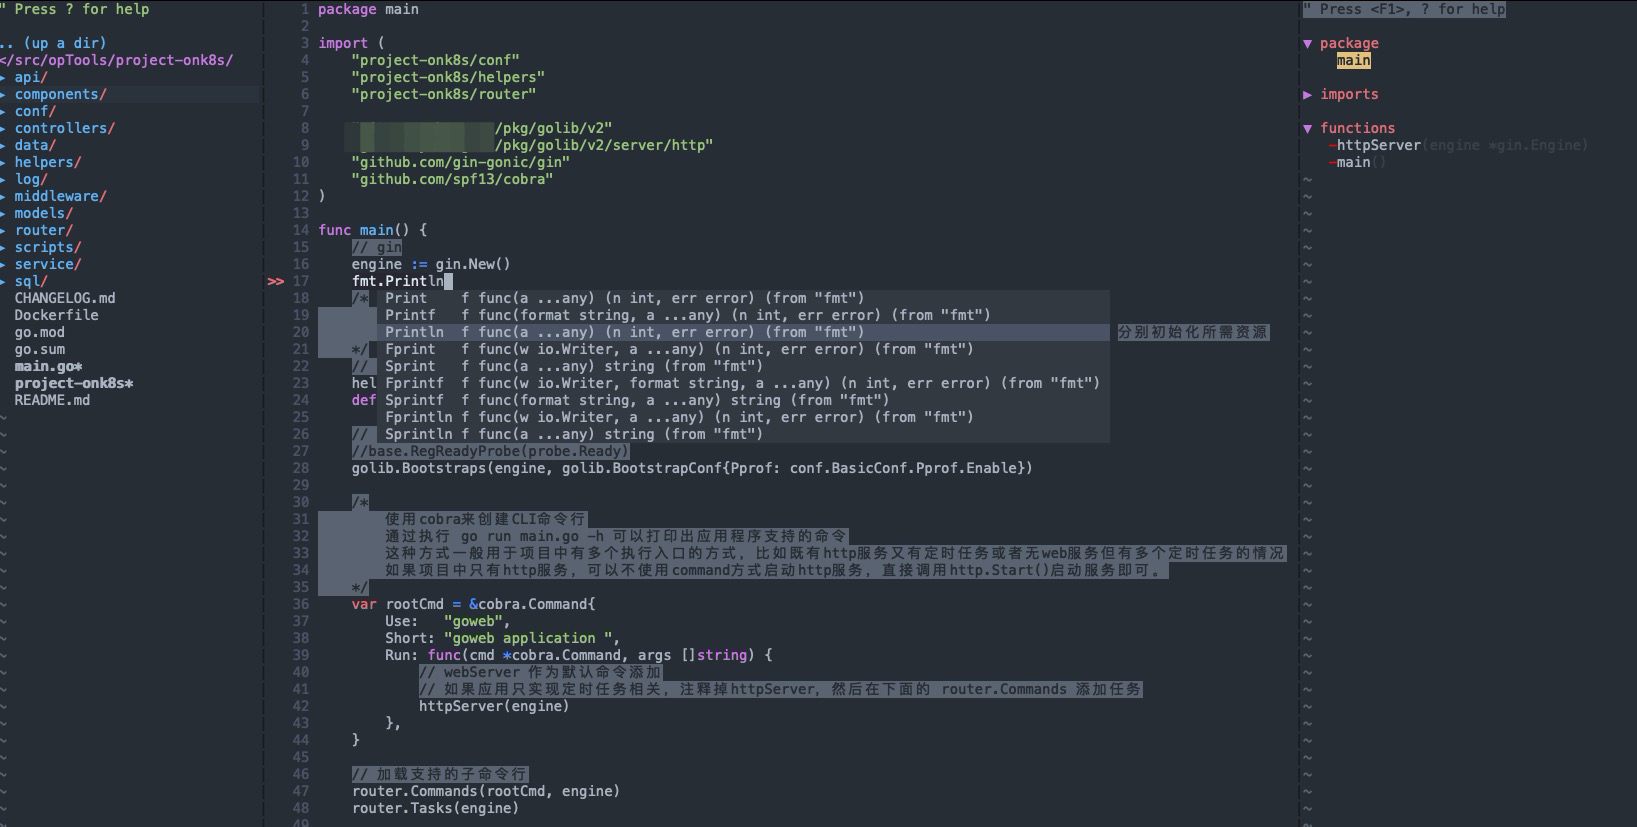
打出fmt.pr 自动提示,无需任何快捷键,没有ycm需要用快捷键crtl+o+x,不知为何没出提示,ycm安装好可自动补全。
以上就是全部的配置了,如果有没讲到的实用配置,请在评论区留言!

