模拟人声-文字生成语音
# 文生音频
# VITS模型介绍
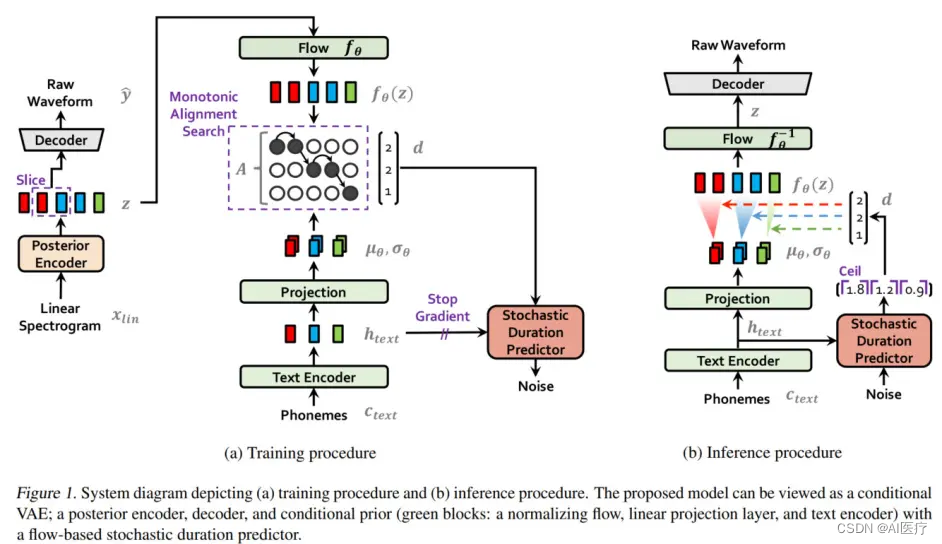
VITS(Variational Inference with adversarial learning for end-to-end Text-to-Speech)是一种语音合成方法,它使用预先训练好的语音编码器 (vocoder声码器) 将文本转化为语音。论文 (opens new window)

VITS 的工作流程如下:
- 将文本输入 VITS 系统,系统会将文本转化为发音规则。
- 将发音规则输入预先训练好的语音编码器 (vocoder),vocoder 会根据发音规则生成语音信号的特征表示。
- 将语音信号的特征表示输入预先训练好的语音合成模型,语音合成模型会根据特征表示生成合成语音。
优点:成的语音质量较高,能够生成流畅的语音。
缺点:需要大量的训练语料来训练 vocoder 和语音合成模型,同时需要较复杂的训练流程。
# VITS-fast-fine-tuning介绍
VITS-fast-fine-tuning是在原始VITS(VITS源码)基础上开发出的一站式多speaker训练的傻瓜式版本,简单易用,可以基于VITS-fast-fine-tuning半小时内无需标注训练任意角色的语音,并提供了基础的预训练模型,可以在预训练模型上进行二次训练,实现任意角色的语音生成。
# 目前支持的任务:
- 从 10条以上的短音频 克隆角色声音
- 从 3分钟以上的长音频(单个音频只能包含单说话人) 克隆角色声音
- 从 3分钟以上的视频(单个视频只能包含单说话人) 克隆角色声音
- 通过输入 bilibili视频链接(单个视频只能包含单说话人) 克隆角色声音
训练步骤如下:
- 准备预训练数据,按照制定格式和路径进行存放,数据无需标注
- 对数据进行预处理,采用whisper模型进行语音提取和切分,形成标注数据。
- 使用提出的带标注的数据进行语音合成训练
# 使用
# 微调
# 硬件要求
内存:16GB+
显存:16GB+(N卡,可多卡)
# 环境配置
python版本:3.9
系统版本:centos7
克隆代码到本地,使用pyenv新建一个环境。
git clone https://github.com/Plachtaa/VITS-fast-fine-tuning.git
# 1. 安装依赖
参考代码中给出的train locally (opens new window) 安装过程中如果需要编译则是因为相关的库没有提供当前pyhton版本的whl文件,建议安装低版本或把requirements.txt中的版本去掉。
pip install -r requirements.txt
- 安装 PyTorch
# CUDA 11.6
pip install torch==1.13.1+cu116 torchvision==0.14.1+cu116 torchaudio==0.13.1 --extra-index-url https://download.pytorch.org/whl/cu116
# CUDA 11.7
pip install torch==1.13.1+cu117 torchvision==0.14.1+cu117 torchaudio==0.13.1 --extra-index-url https://download.pytorch.org/whl/cu117
2
3
4
- 安装处理视频所需要的库
pip install imageio==2.4.1
pip install moviepy
2
- 安装ffmpeg4.1版本
# 2. 构建单调对齐
cd monotonic_align
mkdir monotonic_align
python setup.py build_ext --inplace
cd ..
2
3
4
# 3. 下载训练辅助数据
# download data for fine-tuning
# 在项目根目录下
wget https://huggingface.co/datasets/Plachta/sampled_audio4ft/resolve/main/sampled_audio4ft_v2.zip
unzip sampled_audio4ft_v2.zip
2
3
4
# 4. 创建音频文件目录
# 预训练模型目录
mkdir pretrained_models
# 视频
mkdir video_data
# 长音频
mkdir raw_audio
# 降噪音频
mkdir denoised_audio
# 短音频目录
mkdir custom_character_voice
# 分段字符语音
mkdir segmented_character_voice
2
3
4
5
6
7
8
9
10
11
12
# 5.下载预训练模型
这里的预训练模型分3中,中文,中日,中日英,选择一种下载并放到指定目录并重命名。
CJE: Trilingual (Chinese, Japanese, English)
CJ: Dualigual (Chinese, Japanese)
C: Chinese only
2
3
Linux
To download CJE model, run the following:
wget https://huggingface.co/spaces/Plachta/VITS-Umamusume-voice-synthesizer/resolve/main/pretrained_models/D_trilingual.pth -O ./pretrained_models/D_0.pth
wget https://huggingface.co/spaces/Plachta/VITS-Umamusume-voice-synthesizer/resolve/main/pretrained_models/G_trilingual.pth -O ./pretrained_models/G_0.pth
wget https://huggingface.co/spaces/Plachta/VITS-Umamusume-voice-synthesizer/resolve/main/configs/uma_trilingual.json -O ./configs/finetune_speaker.json
2
3
To download CJ model, run the following:
wget https://huggingface.co/spaces/sayashi/vits-uma-genshin-honkai/resolve/main/model/D_0-p.pth -O ./pretrained_models/D_0.pth
wget https://huggingface.co/spaces/sayashi/vits-uma-genshin-honkai/resolve/main/model/G_0-p.pth -O ./pretrained_models/G_0.pth
wget https://huggingface.co/spaces/sayashi/vits-uma-genshin-honkai/resolve/main/model/config.json -O ./configs/finetune_speaker.json
2
3
To download C model, run the follwoing:
wget https://huggingface.co/datasets/Plachta/sampled_audio4ft/resolve/main/VITS-Chinese/D_0.pth -O ./pretrained_models/D_0.pth
wget https://huggingface.co/datasets/Plachta/sampled_audio4ft/resolve/main/VITS-Chinese/G_0.pth -O ./pretrained_models/G_0.pth
wget https://huggingface.co/datasets/Plachta/sampled_audio4ft/resolve/main/VITS-Chinese/config.json -O ./configs/finetune_speaker.json
2
3
# 6. 音频数据文件
将需要进行模拟的音频文件放到第4步创建的目录中,当前支持4中方式,任选一种即可。
- 短音频
要求:wav格式,每段小于10s,最少10段,建议不少于20段
同一个人的音频文件放到一个目录中,目录放到创建的custom_character_voice下
例:
custom_character_voice]$ tree
.

└── zhangsan
    ├── 01.wav
    ├── 02.wav
    ├── 03.wav
    ├── 04.wav
2
3
4
5
6
7
8
- 长音频
- 视频
- b站视频连接
# 7. 处理音频文件
# 将所有视频(无论是上传的还是下载的,且必须是.mp4格式)抽取音频
python scripts/video2audio.py
# 将所有音频(无论是上传的还是从视频抽取的,必须是.wav格式)降噪
python scripts/denoise_audio.py
# 分割并标注长音频
python scripts/long_audio_transcribe.py --languages "{PRETRAINED_MODEL}" --whisper_size large
# 标注短音频
python scripts/short_audio_transcribe.py --languages "{PRETRAINED_MODEL}" --whisper_size large
# 底模采样率可能与辅助数据不同,需要重采样,此时,音频目录下会多出很多新的文件
python scripts/resample.py
2
3
4
5
6
7
8
9
10
{PRETRAINED_MODEL} 和上面下载预训练模型保持一致,C , CJ, CJE
此时项目根目录下会出现我们使用端音频识别出来的文本如标注段音频产生的short_character_anno.txt ,可以检查里面的断句是否符合预期,如有问题,可调整。
# 8. 预处理训练数据
这里可以选不添加辅助数据,但issue中反馈不使用可能会造成无法保存模型,建议100条以下音频样本或质量不佳的样本使用辅助数据。
python3 preprocess_v2.py --add_auxiliary_data True --languages "{PRETRAINED_MODEL}"
{PRETRAINED_MODEL} 和上面下载预训练模型保持一致,C , CJ, CJE
# 9. 开始训练模型
全新训练(
OUTPUT_MODEL目录 为空)python3 finetune_speaker_v2.py -m "./OUTPUT_MODEL" --max_epochs "{Maximum_epochs}" --drop_speaker_embed True1
{Maximum_epochs} 建议大于100
继续训练
需要保证
OUTPUT_MODEL目录存在G_latest.pth和D_latest.pthpython finetune_speaker_v2.py -m ./OUTPUT_MODEL --max_epochs "{Maximum_epochs}" --drop_speaker_embed False --cont True1
# 10. 推理
cp ./configs/modified_finetune_speaker.json ./finetune_speaker.json
python VC_inference.py --model_dir ./OUTPUT_MODEL/G_latest.pth --share True
2
# 11. 关于重新训练
需要删除以下几个目录或文件
OUTPUT_MODEL
denoised_audio
custom_character_voice下音频文件以processed开头的文件
separated
segmented_character_voice
同时删除 txt 文件(第8步生成的):
final_annotation_train.txt
final_annotation_val.txt
如果是继续训练,除OUTPUT_MODEL不动,其他继续以上操作。
# 参考
[1] [VITS-fast-fine-tuning (opens new window)](https://github.com/Plachtaa/VITS-fast-fine-tuning/tree/main)
[2] 基于VITS-fast-fine-tuning构建多speaker语音训练 (opens new window)

